はじめに
iOS9 で MetalKit が導入され、Metal を利用しやすくなりました。
今回は、MetalKit を使ったアプリの実装例とともに紹介したいと思います。
Metal とは
Metal は、iOS8 で導入された、画像処理やデータ並列演算などを効率的に行うためのフレームワークです。
iOS 端末では、A7 以降の SoC を搭載していれば利用可能です。(iPhone 5s以降の端末やiPad Air以降の端末など)
OS X 11.11 El Capitan からは、OS X でも使用できるようになりました。
MetalKit が登場するまでは、Metal を使用して描画するには
UIView の Layer を操作したりと敷居が高く感じられました。
ですが、MetalKit が登場したことで Metal は使いやすくなりました。
Metal の類似技術として、以下のようなものがあります。
- Mantle (AMD)
- Direct 3D 12 (Microsoft)
- Vulkan (Khronos Group)
MetalKit
Metal を使用したアプリの実装を楽にしてくれるフレームワークです。
以下が主要なコンポーネントです。
| コンポーネント |
説明 |
MetalKit View (MTKView) |
UIView/NSView を継承した Metal を使用して描画するための View
描画は、MTKView のサブクラスを定義するか、MTKView のデリゲート (MTKViewDelegate) を使用して行います |
Texture Loader (MTKTextureLoader) |
画像ファイルから Metal で使用できる Texture を作成 |
| Model I/O integration |
Metal でのレンダリングに使用するメッシュデータの管理 |
特徴
Metal は以下の特徴があります。
- オーバーヘッドが小さい
- コンパイル済みのシェーダー
- 画像と演算の両方に使える
- 効率的なマルチスレッディング
他の Apple のフレームワークとの違い
画像処理や描画処理は、これまでも CoreImage などを使って行っていました。
これらのフレームワークと Metal の違いは、描画時のレイヤーが異なるということです。
| フレームワーク |
レイヤー |
| SceneKit |
OpenGL ES -> GPU |
| SpriteKit |
OpenGL ES -> GPU |
| CoreImage |
OpenGL ES -> GPU |
| CoreGraphics |
OpenGL ES -> GPU |
| CoreAnimation |
OpenGL ES -> GPU |
| Metal |
Metal -> GPU |
上記のように、OpenGL ES から GPU を使用しているというものが、Metal から GPU を操作するという流れに変わります。
用語
Metal の構造を理解する上で、以下のキーワードを押さえておくと理解しやすくなります。
| 用語 (Protocol) |
説明 |
デバイス MTLDevice |
GPU を抽象化したプロトコル
GPU 固有のバッファーやテクスチャーの作成
GPU とのコマンドのやり取り |
コマンドキュー MTLCommandQueue |
コマンドバッファー (MTLCommandBuffer) のキュー
コマンドバッファーの実行順を管理 |
コマンドバッファー MTLCommandBuffer |
特定のデバイスで実行されるコマンドを格納 |
コマンドエンコーダー MTLCommandEncoder |
GPU で実行する処理をコマンドバッファーに追加する |
MTLRenderCommandEncoder |
グラフィックスのレンダリング処理用のコマンドエンコーダー |
MTLComputeCommandEncoder |
データ並列演算処理用のコマンドエンコーダー |
MTLBlitCommandEncoder |
バッファー、テクスチャーでのコピー処理、ミップマップ生成用のコマンドエンコーダー |
リソース MTLResource |
GPU のメモリに割り当てられるオブジェクト |
バッファー MTLBuffer |
非整形データ
どのような種類のデータでも良い |
テクスチャー MTLTexture |
整形された画像データ |
関数 MTLFunction |
Metal シェーディング言語で書かれたシェーダーや演算処理 |
ライブラリ MTLLibrary |
関数のリポジトリ
ビルド時にコンパイルされたバイナリ、または、アプリ実行時にコンパイルしたバイナリ |
Metal で描画する流れ
- 初期化
- デバイスの作成
- コマンドキューの作成
- リソースの作成
- バッファーやテクスチャの作成や読み込み
- レンダーパイプラインの作成
- 描画
- コマンドバッファーの作成
- 初期化時に作成したコマンドキューを利用
- レンダーパスの開始
- 描画
- GPU に描画命令を送信
描画処理を想定して書いていますが、演算時も基本的に同じ流れになります。
演算時は、レンダーパイプラインとして演算用のレンダーパイプラインを使用します。
Metal の使用例
開発上の注意点
iOS アプリを実装する場合の注意点として、Metal はシミュレーターでは動作しないという点があります。
iOS アプリ開発を行う場合は、デバイスを Mac に接続している実機もしくは ‘Generic iOS Device’ にする必要があります。
シミュレーターを選択している場合、MetalKit が見つからないためビルドができません。
三角形を描画してみる
以下の画像のように、緑の背景にグラデーションしている三角形を View に描画してみます。

解説
MetalKit を使用して描画を行います。
MTKView を継承した
MetalView というクラスを作成し、
func drawRect(dirtyRect: NSRect) をオーバーライドします。
import MetalKit
class MetalView: MTKView {
    override func drawRect(dirtyRect: NSRect) {
        super.drawRect(dirtyRect)
    }
}
MTKView は、プロパティ
device でデバイスを管理しています。
まず、デバイスを作成し
device で保持します。
self.device = MTLCreateSystemDefaultDevice()
デバイス作成後、Metalを使用した描画の設定を行っていきます。
ここでは以下のことを行います。
- 描画する三角形の頂点を設定する
- レンダーパスの設定
- コマンドバッファーの設定
- コマンドを GPU に送信
描画する三角形の頂点情報として、以下の構造体を定義します。
struct Vertex {
    var position: vector_float4
    var color: vector_float4
}
ここで、
vector_float4 は長さ 4 の
float 型の配列です。(モジュール
simd.vector_types で定義されています)
Vertexは頂点の位置と色の情報を持ちます。
次に、
Vertex を使用して三角形の定義をします。
let vertexData = [Vertex(position: [-1.0, -1.0, 0.0, 1.0], color: [1, 0, 0, 1]),
                  Vertex(position: [ 0.0, -1.0, 0.0, 1.0], color: [0, 1, 0, 1]),
                  Vertex(position: [-0.5,  1.0, 0.0, 1.0], color: [0, 0, 1, 1]),]
ここまでで描画する三角形の定義が終わりました。
次に、レンダーパスの設定を行っていきます。
レンダーパスの設定では、レンダリングに使用する関数の設定や描画するピクセルの形式などを設定します。
guard let library = device.newDefaultLibrary() else {
    NSLog("Failed to create library")
    return
}
let vertexFunction = library.newFunctionWithName("vertex_func")
let fragmentFunction = library.newFunctionWithName("fragment_func")
let renderPipelineDescriptor = MTLRenderPipelineDescriptor()
renderPipelineDescriptor.vertexFunction = vertexFunction
renderPipelineDescriptor.fragmentFunction = fragmentFunction
renderPipelineDescriptor.colorAttachments[0].pixelFormat = .BGRA8Unorm
do {
    let renderPipelineState = try device.newRenderPipelineStateWithDescriptor(renderPipelineDescriptor)
} catch let error {
    NSLog("\(error)")
}
まず、アプリケーションのバンドルからライブラリを取得します。
guard let library = device.newDefaultLibrary() else {
    NSLog("Failed to create library")
    return
}
次に、ライブラリから使用するバーテックスシェーダー(頂点に対する処理)とフラグメントシェーダー(各頂点の色に対する処理)を設定します。
ライブラリからそれぞれの関数を取得しレンダーパスに設定を行います。
各シェーダーについては後ほど解説します。
let vertexFunction = library.newFunctionWithName("vertex_func")
let fragmentFunction = library.newFunctionWithName("fragment_func")
let renderPipelineDescriptor = MTLRenderPipelineDescriptor()
renderPipelineDescriptor.vertexFunction = vertexFunction
renderPipelineDescriptor.fragmentFunction = fragmentFunction
最後にピクセル情報の設定をし、パイプラインステートを作成します。
ピクセル情報は、列挙型
MTLPixelFormat で定義された値を設定します。
基本的には
BGRA8Unorm や
RGBA8Unorm を設定すれば良いと思います。
renderPipelineDescriptor.colorAttachments[0].pixelFormat = .BGRA8Unorm
do {
    let renderPipelineState = try device.newRenderPipelineStateWithDescriptor(renderPipelineDescriptor)
} catch let error {
    NSLog("\(error)")
}
次に、ここまでに作成した頂点情報とパイプラインステートをコマンドエンコーダーに設定します。
コマンドエンコーダーを作成する前に、まずデバイスからコマンドキューとコマンドバッファーを作成します。
作成したコマンドバッファーに、現在のフレームを描画する
MTKView.currentDrawable のレンダーパスの設定を渡してコマンドエンコーダーを作成します。
また、
MTKView.currentDrawable のレンダーパスに対し背景色 (
clearColor) を設定しておきます。
三角形の頂点情報からバーテックスバッファーを作成し、コマンドエンコーダーに設定します。
パイプラインステートも同様に、コマンドエンコーダーに設定します。
最後に、描画命令を設定しコマンドエンコーダーでのコマンドの作成を完了します。
guard let renderPassDescriptor = self.currentRenderPassDescriptor, drawable = self.currentDrawable else {
    return
}
renderPassDescriptor.colorAttachments[0].clearColor = MTLClearColorMake(0, 0.7, 0, 1.0)
let commandBuffer = device.newCommandQueue().commandBuffer()
let renderCommandEncoder = commandBuffer.renderCommandEncoderWithDescriptor(renderPassDescriptor)
renderCommandEncoder.setRenderPipelineState(renderPipelineState)
let vertexBuffer = device.newBufferWithBytes(vertexData, length: sizeofValue(vertexData[0]) * vertexData.count, options:[])
renderCommandEncoder.setVertexBuffer(vertexBuffer, offset: 0, atIndex: 0)
renderCommandEncoder.drawPrimitives(.Triangle, vertexStart: 0, vertexCount: 3, instanceCount: 1)
renderCommandEncoder.endEncoding()
以上で描画の設定が完了しましたので、コマンドバッファーから現在のフレームに対し描画をするように要求します。
commandBuffer.presentDrawable(drawable)
commandBuffer.commit()
バーテックスシェーダーとフラグメントシェーダーは、
.metal ファイルに書きます。
各シェーダーは、C++11 を基にした Metal シェーディング言語を使用して書きます。
まず、アプリ側で定義した
Vertex をシェーダー側でも定義します。
Swift での定義とほぼ同じになりますが、1 点 Metal シェーディング言語では異なる点があります。
それは、
position にバーテックスの位置を表すことを意味する
[[position]] という指定子を追加するということです。
struct Vertex {
    float4 position [[position]];
    float4 color;
};
シェーダーは通常の C++ での関数と同じように定義しますが、シェーダーの種類に応じて関数の戻り値の前に指定子を書く必要があります。
| 指定子 |
シェーダーの種類 |
| kernel |
データ並列演算に使用するシェーダー |
| vertex |
バーテックスシェーダー |
| fragment |
フラグメントシェーダー |
引数で渡されたものをどのバッファーから持ってくるかなどの情報を指定するために、引数にも幾つか指定子を書く必要があります。
引数名の後にこれらの指定子を書きます。
| 指定子 |
種類 |
| buffer(index) |
バッファー |
| texture(index) |
テクスチャー |
| sampler(index) |
サンプラー |
| threadgroup(index) |
スレッドグループメモリー |
| vertex_id |
頂点のID |
| stage_in |
シェーダーへの入力 |
括弧内の
index は、
renderCommandEncoder.setVertexBuffer(vertexBuffer, offset: 0, atIndex: 0) などコマンドエンコーダーで設定したインデックスの値と対応します。
これらの指定子の詳細は、
Metal Shading Language Guide – Functions, Variables, and Qualifiers を参考にしてください。
各シェーダーの中身は、以下のようになっています。
vertex Vertex vertex_func(constant Vertex *vertices [[buffer(0)]],
                          uint vid [[vertex_id]]) {
    return vertices[vid];
}
fragment float4 fragment_func(Vertex vert [[stage_in]]) {
    float3 inColor = float3(vert.color.x, vert.color.y, vert.color.z);
    half gray = dot(kRec709Luma, inColor);
    float4 outColor = float4(gray, gray, gray, 1);
    return outColor;
}
コード
import MetalKit
struct Vertex {
    var position: vector_float4
    var color: vector_float4
}
class MetalView: MTKView {
    override func drawRect(dirtyRect: NSRect) {
        super.drawRect(dirtyRect)
        self.device = MTLCreateSystemDefaultDevice()
        guard let device = self.device else {
            NSLog("Failed to create Metal device")
            return
        }
        let vertexData = [Vertex(position: [-1.0, -1.0, 0.0, 1.0], color: [1, 0, 0, 1]),
                          Vertex(position: [ 0.0, -1.0, 0.0, 1.0], color: [0, 1, 0, 1]),
                          Vertex(position: [-0.5,  1.0, 0.0, 1.0], color: [0, 0, 1, 1]),]
        let vertexBuffer = device.newBufferWithBytes(vertexData, length: sizeofValue(vertexData[0]) * vertexData.count, options:[])
        guard let library = device.newDefaultLibrary() else {
            NSLog("Failed to create library")
            return
        }
        let vertexFunction = library.newFunctionWithName("vertex_func")
        let fragmentFunction = library.newFunctionWithName("fragment_func")
        let renderPipelineDescriptor = MTLRenderPipelineDescriptor()
        renderPipelineDescriptor.vertexFunction = vertexFunction
        renderPipelineDescriptor.fragmentFunction = fragmentFunction
        renderPipelineDescriptor.colorAttachments[0].pixelFormat = .BGRA8Unorm
        do {
            let renderPipelineState = try device.newRenderPipelineStateWithDescriptor(renderPipelineDescriptor)
            guard let renderPassDescriptor = self.currentRenderPassDescriptor, drawable = self.currentDrawable else {
                return
            }
            renderPassDescriptor.colorAttachments[0].clearColor = MTLClearColorMake(0, 0.7, 0, 1.0)
            let commandBuffer = device.newCommandQueue().commandBuffer()
            let renderCommandEncoder = commandBuffer.renderCommandEncoderWithDescriptor(renderPassDescriptor)
            renderCommandEncoder.setRenderPipelineState(renderPipelineState)
            renderCommandEncoder.setVertexBuffer(vertexBuffer, offset: 0, atIndex: 0)
            renderCommandEncoder.drawPrimitives(.Triangle, vertexStart: 0, vertexCount: 3, instanceCount: 1)
            renderCommandEncoder.endEncoding()
            commandBuffer.presentDrawable(drawable)
            commandBuffer.commit()
        } catch let error {
            NSLog("\(error)")
        }
    }
}
#include
using namespace metal;
// Rec 709 LUMA values for grayscale image conversion
constant float3 kRec709Luma = float3(0.2126, 0.7152, 0.0722);
struct Vertex {
    float4 position [[position]];
    float4 color;
};
vertex Vertex vertex_func(constant Vertex *vertices [[buffer(0)]],
                          uint vid [[vertex_id]]) {
    return vertices[vid];
}
fragment float4 fragment_func(Vertex vert [[stage_in]]) {
    float3 inColor = float3(vert.color.x, vert.color.y, vert.color.z);
    half gray = dot(kRec709Luma, inColor);
    float4 outColor = float4(gray, gray, gray, 1);
    return outColor;
}
解説とコードの補足
今回は解説用に、本来は推奨されない実装を行っています。
(今回のような三角形を描画するくらいだと問題にならないですが、ゲームなど性能が要求される場合には問題なります。)
今回は、描画のたびに以下のものを作成しています。
- コマンドキュー
- バッファー
- ライブラリ
- レンダーパイプライン
今回使用していませんがテクスチャーも同様です。
これらのものは、インスタンス化や破棄のコストが大きいため使い回すことが推奨されています。
ですので開発の際はこれらを初期化するメソッドと、生成したものを使ってレンダリングをするメソッドと分けて実装を行ってください。
テクスチャーを使ってみる
先ほどは、単純に三角形を描画してみました。
次は、描画した三角形にテクスチャーを貼ってみます。

解説
テクスチャーを貼るには、以下のことを行います。
- テクスチャーの読み込み
- テクスチャーマッピングの設定
- 頂点情報とテクスチャーを GPU に送る
- フラグメントシェーダーでテクスチャーを貼る
テクスチャーを読み込みには、まずデバイスに対し
MTKTextureLoader のインスタンスを作成します。
テクスチャーは以下のものから読み込めます。
今回は、URL からテクスチャーの読み込みを行います。
let textureLoader = MTKTextureLoader(device: device)
self.texture = try? textureLoader.newTextureWithContentsOfURL(textureImageFilePath, options: nil)
次に、どの頂点にどのテクスチャーの座標を合わせるかを設定します。
この時、上記のように読み込むとテクスチャーのサイズが正規化されていることに注意が必要です。
そのためテクスチャーは、原点を (0, 0) 大きさを (1, 1) とした領域で表されています。
このことに注意して設定を行います。
struct Vertex {
    // 頂点の座標
    var position: vector_float4
    // テクスチャーの座標
    var coordinate: vector_float2
    // GPU に送信する際のパッディング用ダミー
    let dummy: vector_float2 = vector_float2(0, 0)
}
...
let vertexData = [Vertex(position: [-1.0, -1.0, 0.0, 1.0], coordinate: [0.0, 0.0]),
                  Vertex(position: [ 0.0, -1.0, 0.0, 1.0], coordinate: [1.0, 0.0]),
                  Vertex(position: [ 0.0,  1.0, 0.0, 1.0], coordinate: [1.0, 1.0]),]
今回テクスチャーは、フラグメントシェーダーで使用します。
なのでコマンドエンコーダーでそのように設定を行います。
renderCommandEncoder.setFragmentTexture(texture, atIndex: 0)
最後にフラグメントシェーダーです。
フラグメントシェーダーでは、渡されたテクスチャーから頂点の位置に対応したテクセルを取得しその色で描画するようにします。
テクセルの取得にはサンプラーを使用します。
今回は、単純なサンプラーで良いのでシェーダー内で生成するようにします。
サンプラーは、コマンドエンコーダーで設定することもできます。
fragment float4 fragment_func(VertexOut vert [[stage_in]],
                              texture2d texture2D [[texture(0)]]) {
    constexpr sampler defaultSampler;
    float4 outColor = texture2D.sample(defaultSampler, vert.coordinate);
    return outColor;
}
コード
import Cocoa
import MetalKit
struct Vertex {
    var position: vector_float4
    var coordinate: vector_float2
    let dummy: vector_float2 = vector_float2(0, 0)
}
class MetalTextureView: MTKView {
    var textureImageFilePath: NSURL?
    var texture: MTLTexture?
    override func awakeFromNib() {
        super.awakeFromNib()
        self.device = MTLCreateSystemDefaultDevice()
    }
    override func drawRect(dirtyRect: NSRect) {
        super.drawRect(dirtyRect)
        guard let device = self.device else {
            NSLog("Device is not created.")
            return
        }
        let textureLoader = MTKTextureLoader(device: device)
        guard let textureImageFilePath = self.textureImageFilePath else {
            NSLog("No texture image path")
            return
        }
        self.texture = try? textureLoader.newTextureWithContentsOfURL(textureImageFilePath, options: nil)
        let vertexData = [Vertex(position: [-1.0, -1.0, 0.0, 1.0], coordinate: [0.0, 0.0]),
                          Vertex(position: [ 0.0, -1.0, 0.0, 1.0], coordinate: [1.0, 0.0]),
                          Vertex(position: [ 0.0,  1.0, 0.0, 1.0], coordinate: [1.0, 1.0]),]
        let vertexBuffer = device.newBufferWithBytes(vertexData, length: sizeofValue(vertexData[0]) * vertexData.count, options:[])
        guard let library = device.newDefaultLibrary() else {
            NSLog("Failed to create library")
            return
        }
        let vertexFunction = library.newFunctionWithName("vertex_func")
        let fragmentFunction = library.newFunctionWithName("fragment_func")
        let renderPipelineDescriptor = MTLRenderPipelineDescriptor()
        renderPipelineDescriptor.vertexFunction = vertexFunction
        renderPipelineDescriptor.fragmentFunction = fragmentFunction
        renderPipelineDescriptor.colorAttachments[0].pixelFormat = .BGRA8Unorm
        do {
            let renderPipelineState = try device.newRenderPipelineStateWithDescriptor(renderPipelineDescriptor)
            guard let renderPassDescriptor = self.currentRenderPassDescriptor, drawable = self.currentDrawable else {
                return
            }
            renderPassDescriptor.colorAttachments[0].clearColor = MTLClearColorMake(0, 0.7, 0, 1.0)
            let commandBuffer = device.newCommandQueue().commandBuffer()
            let renderCommandEncoder = commandBuffer.renderCommandEncoderWithDescriptor(renderPassDescriptor)
            renderCommandEncoder.setRenderPipelineState(renderPipelineState)
            renderCommandEncoder.setVertexBuffer(vertexBuffer, offset: 0, atIndex: 0)
            renderCommandEncoder.setFragmentTexture(texture, atIndex: 0)
            renderCommandEncoder.drawPrimitives(.Triangle, vertexStart: 0, vertexCount: 3, instanceCount: 1)
            renderCommandEncoder.endEncoding()
            commandBuffer.presentDrawable(drawable)
            commandBuffer.commit()
        } catch let error {
            NSLog("\(error)")
        }
    }
}
#include
#include
using namespace metal;
struct VertexIn {
    packed_float4 position;
    packed_float4 coordinate;
};
struct VertexOut {
    float4 position [[position]];
    float2 coordinate;
};
vertex VertexOut vertex_func(constant VertexIn *vertices [[buffer(0)]],
                             uint vid [[vertex_id]]) {
    VertexIn inVertex = vertices[vid];
    VertexOut outVertex;
    outVertex.position = inVertex.position;
    outVertex.coordinate = float2(inVertex.coordinate[0], inVertex.coordinate[1]);
    return outVertex;
}
fragment float4 fragment_func(VertexOut vert [[stage_in]],
                              texture2d texture2D [[texture(0)]]) {
    constexpr sampler quadSampler;
    float4 outColor = texture2D.sample(quadSampler, vert.coordinate);
    return outColor;
}
モンテカルロ法で円周率を計算してみる
解説
モンテカルロ法で円周率を計算するフローは以下のようになります。(現実的には、以下の流れでは無駄が多いので最適化の余地はかなりあります)
N 個の入力データの準備
- 各点が円の中にあるかどうかの判定
- 円の中にある点の数
N' を数える
- 円周率の近似値を計算
上記の処理中 2. の部分は並列に処理ができますので、この部分を Metal で処理させます。
ここでは、Metal に関連した処理のみ解説します。
まず、1. で作成した入力用のデータと Metal での計算結果を格納する配列を作成します。
次に、データの受け渡しのためにこれらの配列用のバッファーを作成しコマンドエンコーダーに設定します。
// Metal に送るデータの設定
let inVectorBuffer = metalConfiguration.device.newBufferWithBytes(inputData.vector, length: inputData.byteLength, options: [])
metalConfiguration.commandEncoder.setBuffer(inVectorBuffer, offset: 0, atIndex: 0)
// Metal から受け取るデータの設定
let outVector = [Bool](count: inputData.vector.count, repeatedValue: false)
let outVectorByteLength = outVector.count * sizeofValue(outVector[0])
let outVectorBuffer = metalConfiguration.device.newBufferWithBytes(outVector, length: outVectorByteLength, options: [])
metalConfiguration.commandEncoder.setBuffer(outVectorBuffer, offset: 0, atIndex: 1)
次に、スレッドグループの設定を行います。
スレッドグループの設定では、GPU で並列に実行されるスレッドの数を設定します。
今回は 1 次元の配列を扱うため、32×1 のスレッドグループを設定します。
// Metal で実行するスレッドの設定
let threadPerGroup = MTLSize(width: 32, height: 1, depth: 1)
let numberOfThredgroups = MTLSize(width: (inputData.vector.count + 31) / 32, height: 1, depth: 1)
metalConfiguration.commandEncoder.dispatchThreadgroups(numberOfThredgroups, threadsPerThreadgroup: threadPerGroup)
あとは、デバイスで実行する関数の設定を行いデバイスで演算を行います。
演算完了後、出力用のバッファーから演算結果を取得します。
// Metal での処理が完了するまで待つ
metalConfiguration.commandBuffer.waitUntilCompleted()
// Metal で計算させた結果を受け取る
let outData = NSData(bytesNoCopy: outVectorBuffer.contents(), length: outVectorByteLength, freeWhenDone: false)
var outArray = [Bool](count: inputData.vector.count, repeatedValue: false)
outData.getBytes(&outArray, length: outVectorByteLength)
コード
func calculatePi() -> Double {
    // 1. N 個の入力データの準備
    let inputData = prepareInputDataSet(10_000_000)
    let metalConfiguration = initMetal()
    // Metal で実行する関数の設定
    guard let mcFunc = metalConfiguration.library.newFunctionWithName("monte_carlo"), computePipelineState = try? metalConfiguration.device.newComputePipelineStateWithFunction(mcFunc) else {
        abort()
    }
    metalConfiguration.commandEncoder.setComputePipelineState(computePipelineState)
    // Metal に送るデータの設定
    let inVectorBuffer = metalConfiguration.device.newBufferWithBytes(inputData.vector, length: inputData.byteLength, options: [])
    metalConfiguration.commandEncoder.setBuffer(inVectorBuffer, offset: 0, atIndex: 0)
    // Metal から受け取るデータの設定
    let outVector = [Bool](count: inputData.vector.count, repeatedValue: false)
    let outVectorByteLength = outVector.count * sizeofValue(outVector[0])
    let outVectorBuffer = metalConfiguration.device.newBufferWithBytes(outVector, length: outVectorByteLength, options: [])
    metalConfiguration.commandEncoder.setBuffer(outVectorBuffer, offset: 0, atIndex: 1)
    // Metal で実行するスレッドの設定
    let threadPerGroup = MTLSize(width: 32, height: 1, depth: 1)
    let numberOfThredgroups = MTLSize(width: (inputData.vector.count + 31) / 32, height: 1, depth: 1)
    metalConfiguration.commandEncoder.dispatchThreadgroups(numberOfThredgroups, threadsPerThreadgroup: threadPerGroup)
    // 設定が終わったので、Metal にコマンドを送り処理を開始させる
    metalConfiguration.commandEncoder.endEncoding()
    metalConfiguration.commandBuffer.commit()
    // Metal での処理が完了するまで待つ
    metalConfiguration.commandBuffer.waitUntilCompleted()
    // Metal で計算させた結果を受け取る
    let outData = NSData(bytesNoCopy: outVectorBuffer.contents(), length: outVectorByteLength, freeWhenDone: false)
    var outArray = [Bool](count: inputData.vector.count, repeatedValue: false)
    outData.getBytes(&outArray, length: outVectorByteLength)
    // 3. 円の中にある点の数 N' を数える
    let count = outArray.reduce(0, combine: {
        $1 ? $0 + 1 : $0
    })
    // 4. 円周率の近似値を計算
    return 4.0 * Double(count) / Double(outArray.count)
}
// Metal の初期化
private func initMetal() -> (device: MTLDevice, commandQueue: MTLCommandQueue, library: MTLLibrary, commandBuffer: MTLCommandBuffer, commandEncoder: MTLComputeCommandEncoder) {
    guard let device = MTLCreateSystemDefaultDevice(), library = device.newDefaultLibrary() else {
        abort()
    }
    let commandQueue = device.newCommandQueue()
    let commandBuffer = commandQueue.commandBuffer()
    let commandEncoder = commandBuffer.computeCommandEncoder()
    return (device, commandQueue, library, commandBuffer, commandEncoder)
}
// 1. size 個の入力データの準備
private func prepareInputDataSet(size: Int) -> (vector: [float2], byteLength: Int) {
    var inVector: [float2] = [float2]()
    for _ in 0..<size {
        let x = Float(arc4random_uniform(UInt32.max)) / Float(UInt32.max)
        let y = Float(arc4random_uniform(UInt32.max)) / Float(UInt32.max)
        inVector.append(float2(x,y))
    }
    let inVectorByteLength = size * sizeofValue(inVector[0])
    return (inVector, inVectorByteLength)
}
#include
using namespace metal;
// 2. 各点が円の中にあるかどうかの判定
kernel void monte_carlo(const device float2 *inPoints [[ buffer(0) ]],
                        device bool *outBools [[ buffer(1) ]],
                        uint id [[ thread_position_in_grid ]])
{
    const float2 location = inPoints[id];
    const float x = location.x;
    const float y = location.y;
    outBools[id] = (sqrt((x * x) + (y * y)) < 1.0) ? true : false;
}
計算結果
10 回計算してみた結果を以下にまとめました。
| 計算結果 |
| 3.1405328 |
| 3.1417576 |
| 3.1423012 |
| 3.141692 |
| 3.1417324 |
| 3.1415832 |
| 3.1412308 |
| 3.1422544 |
| 3.1420528 |
| 3.140666 |
Metal で画像処理
並列演算といえば、画像処理ということです。

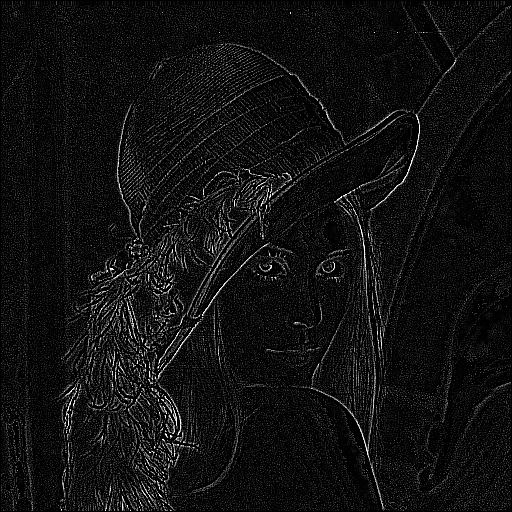
解説
Metal を使用した画像処理の流れは、以下のようになります。
- 画像処理用の画像を
MTKTextureLoader を使用して読み込む
- 画像処理結果の画像用のテクスチャーを作成
- GPU で画像処理
- 画像処理結果のテクスチャーから画像を作成
画像処理結果のテクスチャーは、
MTKTextureLoader で読み込んだテクスチャーと同じ大きさで作成します。
この時注意が必要なのは、
NSImage/
UIImage のプロパティ
sizeを使用してはいけないということです。
size は、DPI や画面のスケールなどが反映されるためピクセルサイズとは異なるためです。
ここで欲しい大きさはピクセルサイズなので、画像サイズは
CGImage または読み込んだテクスチャーから取得してください。
また、画像処理結果のテクスチャーの用途 (
usage) を書き込み用 (
ShaderWrite) に設定します。
let outTextureDescriptor = MTLTextureDescriptor.texture2DDescriptorWithPixelFormat(.RGBA8Unorm, width: Int(texture.width), height: Int(texture.height), mipmapped: false)
outTextureDescriptor.usage = .ShaderWrite
let outTexture = device.newTextureWithDescriptor(outTextureDescriptor)
GPU で画像処理を行った結果の画像は、バイト列として取得しそのバイト列から
CGImage を作成します。
ここで、テクスチャーは左上が原点 (0, 0) となっていることに注意が必要です。
そのため、テクスチャーから作成した
CGImage そのままだと上下が反転した状態の画像になります。
最終的な画像では、作成した
CGImage を元の状態に戻すために上下反転させて画像を出力します。
コード
public func process(url: NSURL) -> NSImage? {
    guard let device = self.device, library = device.newDefaultLibrary() else {
        return nil
    }
    let commandQueue = device.newCommandQueue()
    let commandBuffer = commandQueue.commandBuffer()
    let commandEncoder = commandBuffer.computeCommandEncoder()
    guard let kernelFunction = library.newFunctionWithName("kernel_func"), computePipelineState = try? device.newComputePipelineStateWithFunction(kernelFunction) else {
        abort()
    }
    commandEncoder.setComputePipelineState(computePipelineState)
    let textureLoader = MTKTextureLoader(device: device)
    let textureLoaderOption = [MTKTextureLoaderOptionAllocateMipmaps:NSNumber(bool: false),
                               MTKTextureLoaderOptionSRGB:NSNumber(bool: false)]
    guard let texture = try? textureLoader.newTextureWithContentsOfURL(url, options: textureLoaderOption) else {
        return nil
    }
    let outTextureDescriptor = MTLTextureDescriptor.texture2DDescriptorWithPixelFormat(.RGBA8Unorm, width: Int(texture.width), height: Int(texture.height), mipmapped: false)
    outTextureDescriptor.usage = .ShaderWrite
    let outTexture = device.newTextureWithDescriptor(outTextureDescriptor)
    let mtlObjectSize = 16
    let threadgroupSize = MTLSizeMake(mtlObjectSize, mtlObjectSize, 1)
    let threadCountW = (Int(outTexture.width) + threadgroupSize.width - 1) / threadgroupSize.width
    let threadCountH = (Int(outTexture.height) + threadgroupSize.height - 1) / threadgroupSize.height
    let threadgroupCount = MTLSizeMake(threadCountW, threadCountH, 1)
    commandEncoder.setComputePipelineState(computePipelineState)
    commandEncoder.setTexture(texture, atIndex: 0)
    commandEncoder.setTexture(outTexture, atIndex: 1)
    commandEncoder.dispatchThreadgroups(threadgroupCount, threadsPerThreadgroup: threadgroupSize)
    commandEncoder.endEncoding()
    commandBuffer.commit()
    commandBuffer.waitUntilCompleted()
    let bitPerComponent: Int = 8
    let bytePerPixel: Int = 4
    let bitsPerPixel = bitPerComponent * bytePerPixel
    let imageSize = CGSize(width: outTexture.width, height: outTexture.height)
    let imageByteCount = Int(imageSize.width * imageSize.height) * bytePerPixel
    let bytesPerRow = bytePerPixel * Int(imageSize.width)
    var imageBytes = [UInt8](count: imageByteCount, repeatedValue: 0)
    let region = MTLRegionMake2D(0, 0, Int(imageSize.width), Int(imageSize.height))
    outTexture.getBytes(&imageBytes, bytesPerRow: Int(bytesPerRow), fromRegion: region, mipmapLevel: 0)
    let providerRef = CGDataProviderCreateWithCFData(
        NSData(bytes: &imageBytes, length: imageBytes.count * sizeof(UInt8))
    )
    let colorSpaceRef = CGColorSpaceCreateDeviceRGB();
    let bitmapInfo = CGBitmapInfo(rawValue: CGBitmapInfo.ByteOrder32Big.rawValue)
    let renderingIntent = CGColorRenderingIntent.RenderingIntentPerceptual
    let imageRef = CGImageCreate(Int(imageSize.width), Int(imageSize.height), bitPerComponent, bitsPerPixel, bytesPerRow, colorSpaceRef, bitmapInfo, providerRef, nil, false, renderingIntent)
    return imageRef?.toNSImage.fix()
}
extension CGImage {
    var size: CGSize {
        let width = CGImageGetWidth(self)
        let height = CGImageGetHeight(self)
        return CGSize(width: width, height: height)
    }
    var toNSImage: NSImage {
        return NSImage(CGImage: self, size: size)
    }
}
extension NSImage {
    var toCGImage: CGImage {
        var imageRect = NSRect(x: 0, y: 0, width: size.width, height: size.height)
        guard let image = CGImageForProposedRect(&imageRect, context: nil, hints: nil) else {
            abort()
        }
        return image
    }
    func fix() -> NSImage {
        var transform = CGAffineTransformIdentity;
        transform = CGAffineTransformTranslate(transform, size.width, size.height)
        transform = CGAffineTransformRotate(transform, CGFloat(M_PI))
        transform = CGAffineTransformTranslate(transform, size.width, 0)
        transform = CGAffineTransformScale(transform, -1, 1)
        let cgImage = self.toCGImage
        let bitsPerComponent = CGImageGetBitsPerComponent(cgImage)
        let bytesPerRow = CGImageGetBytesPerRow(cgImage)
        let colorspace = CGImageGetColorSpace(cgImage)
        guard let ctx = CGBitmapContextCreate(nil, Int(size.width), Int(size.height), bitsPerComponent, bytesPerRow, colorspace, CGImageAlphaInfo.PremultipliedLast.rawValue) else {
            abort()
        }
        CGContextConcatCTM(ctx, transform)
        CGContextDrawImage(ctx, CGRectMake(0, 0, size.width, size.height), cgImage)
        guard let drawedCGImage = CGBitmapContextCreateImage(ctx) else {
            abort()
        }
        return NSImage(CGImage: drawedCGImage, size: drawedCGImage.size)
    }
}
#include
using namespace metal;
kernel void kernel_func(texture2d<half, access::read> inTexture [[ texture(0) ]],
                        texture2d<half, access::write> outTexture [[ texture(1) ]],
                        uint2 gid [[thread_position_in_grid]]) {
    matrix<half, 3, 3> weights;
    constexpr int size = 3;
    constexpr int radius = size / 2;
    weights[0][0] = 1;
    weights[0][1] = 1;
    weights[0][2] = 1;
    weights[1][0] = 1;
    weights[1][1] = -8;
    weights[1][2] = 1;
    weights[2][0] = 1;
    weights[2][1] = 1;
    weights[2][2] = 1;
    half4 accumColor(0, 0, 0, 0);
    for (int j = 0; j < size; ++j)
    {
        for (int i = 0; i < size; ++i)
        {
            uint2 textureIndex(gid.x + (i - radius), gid.y + (j - radius));
            half4 color = inTexture.read(textureIndex).rgba;
            half weight = weights[i][j];
            accumColor += weight * color;
        }
    }
    half value = dot(accumColor.rgb, half3(0.299, 0.587, 0.114));
    half4 grayColor(value, value, value, 1.0);
    outTexture.write(grayColor, gid);
}
まとめ
今回は、MetalKit を使用したレンダリングやデータ並列演算を簡単に紹介しました。
MTKView や
MTKTextureLoader を使用することで、簡単に Metal を使えるのが分かったのではないかと思います。
参考
ギャップロを運営しているアップフロンティア株式会社では、一緒に働いてくれる仲間を随時、募集しています。
興味がある!一緒に働いてみたい!という方は下記よりご応募お待ちしております。
採用情報をみる