先日の Flutter Live で発表された「2D アニメーション作成ツールFlare」を早速触ってみました。
事前準備
- Flutter インストール/開発環境構築
- 公式ドキュメントに沿って行えば1、2時間ほどで終わるはず(諸々ダウンロード除く)
- 2Dmensionsアカウント作成
Flare ファイル作成
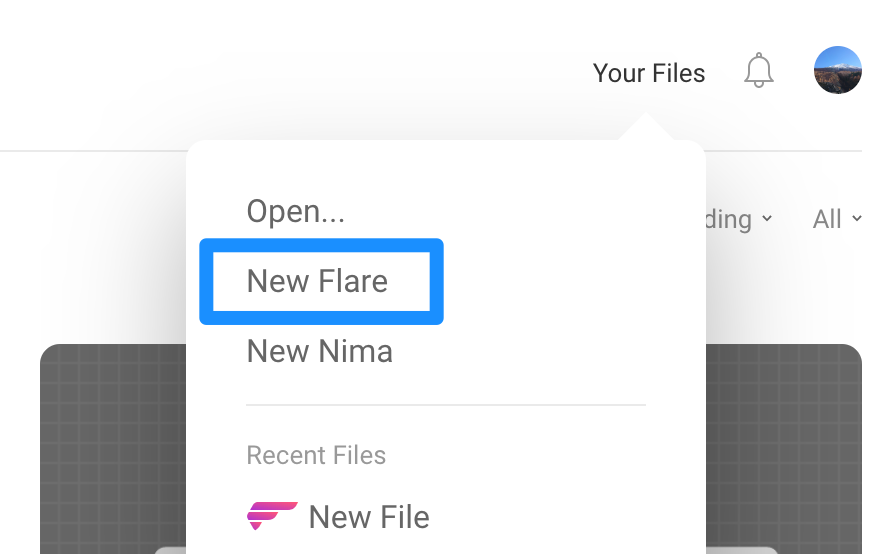
Flare ファイルは2Dmensions のサイト上で作成・編集を行なっていきます。早速何かアニメーションを作ってみましょう!
画面右上の New Flare を選択してください。
公開設定、 Fork 許可などを設定。

あとは作成するだけ!
自分は非デザイナーですが、 UI はシンプルで特に細かい説明とかなくても直感的で分かりやすかったです。

Flare ファイルのエクスポート
今度は、作成したファイルをエクスポートして Flutter に組み込んでいきましょう!
…ただ自分のは粗末な出来でアニメーションつけるのもちょっと手間だったので、他の方のファイルを利用しました。 公開設定されているファイルは、こちらに一覧で表示されていて、 Flar ファイルをエクスポートすることができます。またどういう作り方、アニメーションをつけているのか中身も見ることができます。
今回はmeteoを使わせていただきました。
“ Creative Commons meteo” by Guido Rosso is licensed under CC BY 4.0"
エクスポートは右上のところから行います。ただ残念ながらRead onlyに設定されているものは Export 出来ないようです。


Engine の箇所は Flutter と Web があります。 Flutter になっていることを確認しエクスポート。Meteor.flrがダウンロード出来ます。

Flare ファイルを Flutter へ組み込み
いよいよ Flutter への組み込みですが、これも特に難しい作業はありません。気楽にいきましょう!
新規プロジェクトの作成
AndroidStudio(もしくは VSCode)で、新規の Flutter Project を作ります。

pubspec.yaml に設定追記
-
dependencies:にflare_flutter:を追記 -
flutter:にassets: - assets/を追記
ソース全文だとこんな感じです。★マークの2カ所が追記部分です。
    name: flutter_flare_app
    description: A new Flutter application.
    # The following defines the version and build number for your application.
    # A version number is three numbers separated by dots, like 1.2.43
    # followed by an optional build number separated by a +.
    # Both the version and the builder number may be overridden in flutter
    # build by specifying --build-name and --build-number, respectively.
    # Read more about versioning at semver.org.
    version: 1.0.0+1
    environment:
      sdk: ">=2.0.0-dev.68.0 <3.0.0"
    dependencies:
      flutter:
        sdk: flutter
      # The following adds the Cupertino Icons font to your application.
      # Use with the CupertinoIcons class for iOS style icons.
      cupertino_icons: ^0.1.2
      # ★追加1
      flare_flutter:
    dev_dependencies:
      flutter_test:
        sdk: flutter
    # For information on the generic Dart part of this file, see the
    # following page: https://www.dartlang.org/tools/pub/pubspec
    # The following section is specific to Flutter.
    flutter:
      # The following line ensures that the Material Icons font is
      # included with your application, so that you can use the icons in
      # the material Icons class.
      uses-material-design: true
      # ★追加2
      assets:
       - assets/
      # An image asset can refer to one or more resolution-specific "variants", see
      # https://flutter.io/assets-and-images/#resolution-aware.
      # For details regarding adding assets from package dependencies, see
      # https://flutter.io/assets-and-images/#from-packages
      # To add custom fonts to your application, add a fonts section here,
      # in this "flutter" section. Each entry in this list should have a
      # "family" key with the font family name, and a "fonts" key with a
      # list giving the asset and other descriptors for the font. For
      # example:
      # fonts:
      #   - family: Schyler
      #     fonts:
      #       - asset: fonts/Schyler-Regular.ttf
      #       - asset: fonts/Schyler-Italic.ttf
      #         style: italic
      #   - family: Trajan Pro
      #     fonts:
      #       - asset: fonts/TrajanPro.ttf
      #       - asset: fonts/TrajanPro_Bold.ttf
      #         weight: 700
      #
      # For details regarding fonts from package dependencies,
      # see https://flutter.io/custom-fonts/#from-packages
assets フォルダの作成
プロジェクトフォルダ直下に assets フォルダを作ります。

flr ファイルの設定
先ほどダウンロードしてきた flr ファイルを、 assets フォルダにドラッグ&ドロップで追加します。

main.drat の編集
実行まであと一歩です。 lib フォルダ下にあるmain.dartに以下の追記・変更をします。
import "package:flare_flutter/flare_actor.dart";の追記- Widget buid(BuildContext context)の中身を以下のものに変更
  @override
  Widget build(BuildContext context) {
      return Scaffold(
        backgroundColor: Colors.black,
        appBar: AppBar(
          title: Text("Flare Sample"),
        ),
        body: Center(
            child: FlareActor(
              "assets/Meteor.flr",  // A. ファイル名指定
              animation: "Idle",    // B. Flar のアニメーション名を設定する
              fit: BoxFit.contain,
            ))
        );
  }
もし Meteor.flr 以外のファイルを試したい場合は、 A のファイル名を変更するのと、 B.の Flar アニメーション名を変更する必要があります。 アニメーション名は Flar ファイル作った際の左下に表示されています。

実行してみましょう!

まとめ
いかがだったでしょうか?
自分は思ってた以上にスムーズに実装できて、最初表示された時は「おぉ!」と声出してしまいました(笑) デザイナー側で作成したものをアプリで表示してみたら、動きが微妙に違ってる…なんて事も、使ってみた感じなさそうです。
まだまだフリーで使えるアニメーションは少ないですが、今後盛り上がればどんどん増えて行くと思います!期待してるよ Flutter !!