
こんにちは。
弊社のiOSアプリ開発は、主にデザイナーがZeplinで画面を構築して、それに倣ってXcodeで作っています。そのフォント指定は、有名で美しい「ヒラギノ」がよく使われています。
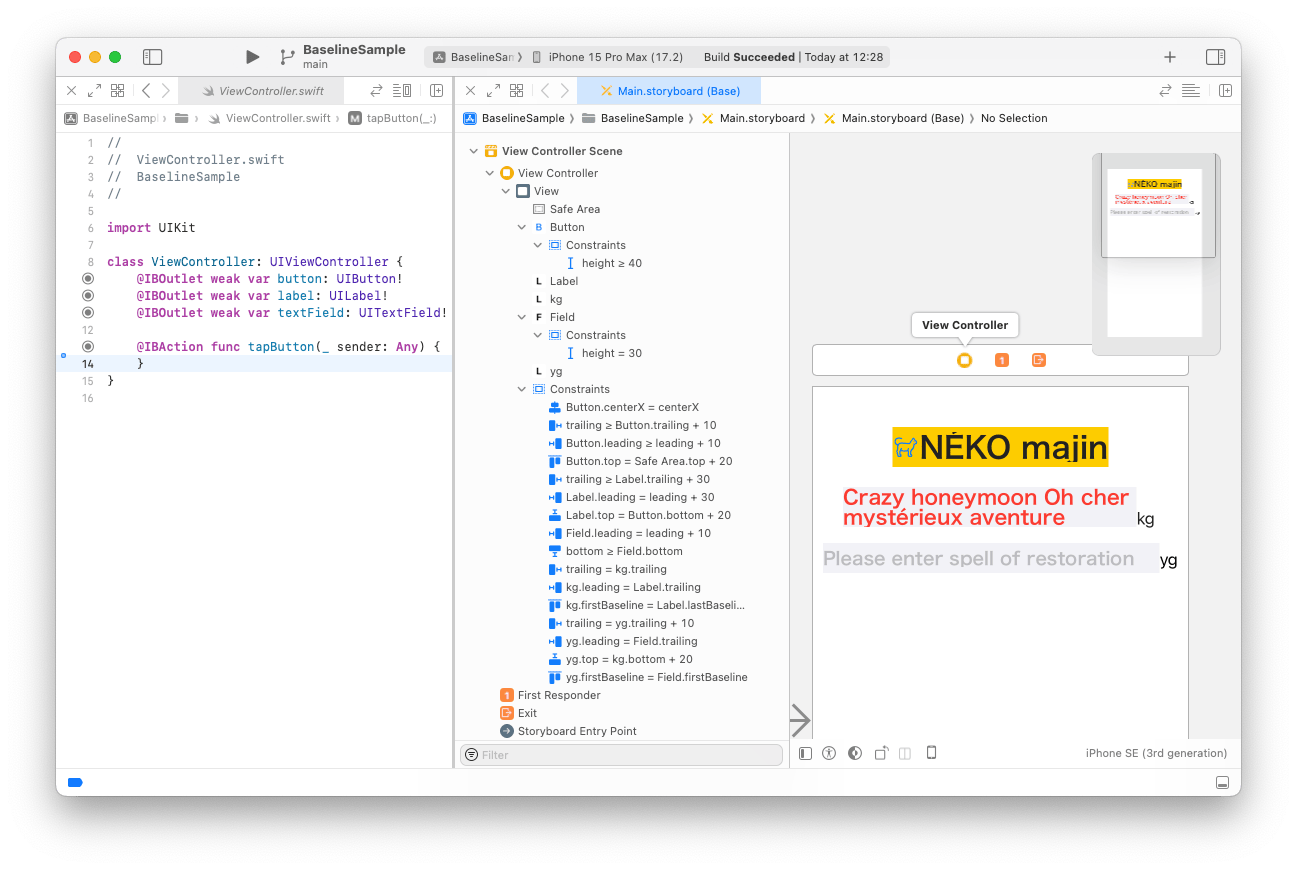
ヒラギノは何故か「É」とか「y」とかの上下が見切れてしまう
この問題、結構昔から挙げられていながら、2024年7月現在でも見られます。
最新のOSやUIKitだけでなく、SwiftUIでも同様の現象が見られることから、フォント自体に不具合がある可能性があります。
今回は、この件についてUILabel、UIButton、UITextFieldに対するシンプルな解決策を提示いたします。(システムフォントを使用していましたが、「なんか小さい」という指摘があったため)
※ UITextViewは、ヒラギノを使っても見切れなかった…なぜ?
contentVerticalAlignment = .fill があるが…
button.contentVerticalAlignment = .fill境界内での垂直コンテンツの配置をfill(埋める)してしまうというもの。
これで手軽に見切れなくなるのですが、ボタンにImageを用いていた場合は、それも上下に広がってしまいます。↓Storyboard上でも設定できます。


PlainでいながらAttributedなテキスト設定を行うクラスを用意する
Storyboard上でのtitle設定を「Plain」のまま、フォントサイズや色を1種類に設定しつつ、コード側で初期化や状態変化したときに属性を加えて「ヒラギノの見切れ」を解消するべく、派生クラスを用意します。
「Plain」から「Attributed」にすることで、文字ごとに色や大きさなど、あらゆる属性をテキスト設定できるけど、ユーザーが決めたColorSetをStoryboardで指定できないし…
文字色やフォントは1種類で良いため、このヒラギノの見切れを解消したい…
という塩梅のソリューションです。

//
//  ExLabel.swift
//  BaselineSample
//

import UIKit

@IBDesignable
class ExLabel : UILabel {
    // コードから初期化
    override init(frame: CGRect) {
        super.init(frame: frame)
        setup()
    }
    // Storyboard/xib から初期化
    required init?(coder: NSCoder) {
        super.init(coder: coder)
    }
    public override func awakeFromNib() {
        super.awakeFromNib()
        setup()
    }
    public override func prepareForInterfaceBuilder() {
        super.prepareForInterfaceBuilder()
        setup()
    }

    private func setup() {
        let text = self.text ?? ""
        var attr: [NSAttributedString.Key : Any]
        if !text.isEmpty, let a = self.attributedText?.attributes(at: 0, effectiveRange: nil) {
            attr = a
        }
        else {
            attr = [:]
        }
        // ヒラギノファミリーのとき、属性を変更
        if self.font.familyName.starts(with: "Hiragino") {
            // ベースラインをdescenderのぶん、上に
            attr[NSAttributedString.Key.baselineOffset] = -self.font.descender
            // 行高さを最大まで補える倍率に設定
            if let p = (attr[NSAttributedString.Key.paragraphStyle] as? NSParagraphStyle)?.mutableCopy() as? NSMutableParagraphStyle {
                p.lineHeightMultiple = font.ascender / font.capHeight
                attr[NSAttributedString.Key.paragraphStyle] = p
            }
        }
        self.attributedText = NSAttributedString(string: text, attributes: attr)
    }
}
まずはUILabelの派生としてExLabelクラス。以下のような処理を追加しています。
- Storyboard等で初期化された属性設定を取得
- フォントがヒラギノファミリーの場合
- フォントのdescender(ベースライン下の延長分)が何故か半分ほど不足しているため、それを補うようにベースラインを上にずらす
- 行高さをフォント高さ最大まで補える倍率に設定することで、上の見切れを解消(参考)
- 更新した属性と、もとのテキストをNSAttributedStringとして、attributedTextにセット
「最初は文字を設定しないけど、あとから追加する」場合は、setNeedsLayout()メソッドあたりをオーバーライドして、このsetup()にある設定をすれば良いです。
//
//  ExButton.swift
//  BaselineSample
//

import UIKit

@IBDesignable
class ExButton : UIButton {
    // コードから初期化
    override init(frame: CGRect) {
        super.init(frame: frame)
        setup()
    }
    // Storyboard/xib から初期化
    required init?(coder: NSCoder) {
        super.init(coder: coder)
    }
    public override func awakeFromNib() {
        super.awakeFromNib()
        setup()
    }
    public override func prepareForInterfaceBuilder() {
        super.prepareForInterfaceBuilder()
        setup()
    }

    private func setup() {
        if let label = self.titleLabel {
            let text = label.text ?? ""
            var attr: [NSAttributedString.Key : Any]
            if !text.isEmpty, let a = label.attributedText?.attributes(at: 0, effectiveRange: nil) {
                attr = a
            }
            else {
                attr = [:]
            }
            // ヒラギノファミリーのとき、属性を変更
            if label.font.familyName.starts(with: "Hiragino") {
                // ベースラインをdescenderのぶん、上に
                attr[NSAttributedString.Key.baselineOffset] = -label.font.descender
                // 行高さを最大まで補える倍率に設定
                if let p = (attr[NSAttributedString.Key.paragraphStyle] as? NSParagraphStyle)?.mutableCopy() as? NSMutableParagraphStyle {
                    p.lineHeightMultiple = label.font.ascender / label.font.capHeight
                    attr[NSAttributedString.Key.paragraphStyle] = p
                }
            }
            label.attributedText = NSAttributedString(string: text, attributes: attr)
        }
    }

}
つぎに、UIButtonの派生として、ExButtonクラス。
UIButtonのtitleLabelを参照して、ExLabelと同様の処理を行っています。
//
//  ExTextField.swift
//  BaselineSample
//

import UIKit

@IBDesignable
class ExTextField : UITextField {
    // コードから初期化
    override init(frame: CGRect) {
        super.init(frame: frame)
        setup()
    }
    // Storyboard/xib から初期化
    required init?(coder: NSCoder) {
        super.init(coder: coder)
    }
    public override func awakeFromNib() {
        super.awakeFromNib()
        setup()
    }
    public override func prepareForInterfaceBuilder() {
        super.prepareForInterfaceBuilder()
        setup()
    }

    private func setup() {
        // placeholder
        let text = self.placeholder ?? ""
        var pAttr: [NSAttributedString.Key : Any]
        if !text.isEmpty, let a = self.attributedPlaceholder?.attributes(at: 0, effectiveRange: nil) {
            pAttr = a
        }
        else {
            pAttr = [:]
        }
        if let font = pAttr[NSAttributedString.Key.font] as? UIFont {
            if font.familyName.starts(with: "Hiragino") {
                // ベースラインをdescenderのぶん、上に
                pAttr[NSAttributedString.Key.baselineOffset] = -font.descender
                // 行高さを最大まで補える倍率に設定
                if let p = (pAttr[NSAttributedString.Key.paragraphStyle] as? NSParagraphStyle)?.mutableCopy() as? NSMutableParagraphStyle {
                    p.lineHeightMultiple = font.ascender / font.capHeight
                    pAttr[NSAttributedString.Key.paragraphStyle] = p
                }
            }
        }
        self.attributedPlaceholder = NSAttributedString(string: text, attributes: pAttr)
    }
}
そして、UITextFieldの派生、ExTextFieldクラス。
上の見切れに関して、テキスト部分はじゅうぶんなビューの高さがあればいいのですが、placeholderに関しては他と同様にlineHeightMultiple属性を設定する必要があります。

さいごに、各Custom Classにそれぞれの派生クラスをセットすれば完成です。
- UIButton → ExButton
- UILabel → ExLabel
- UITextField → ExTextField
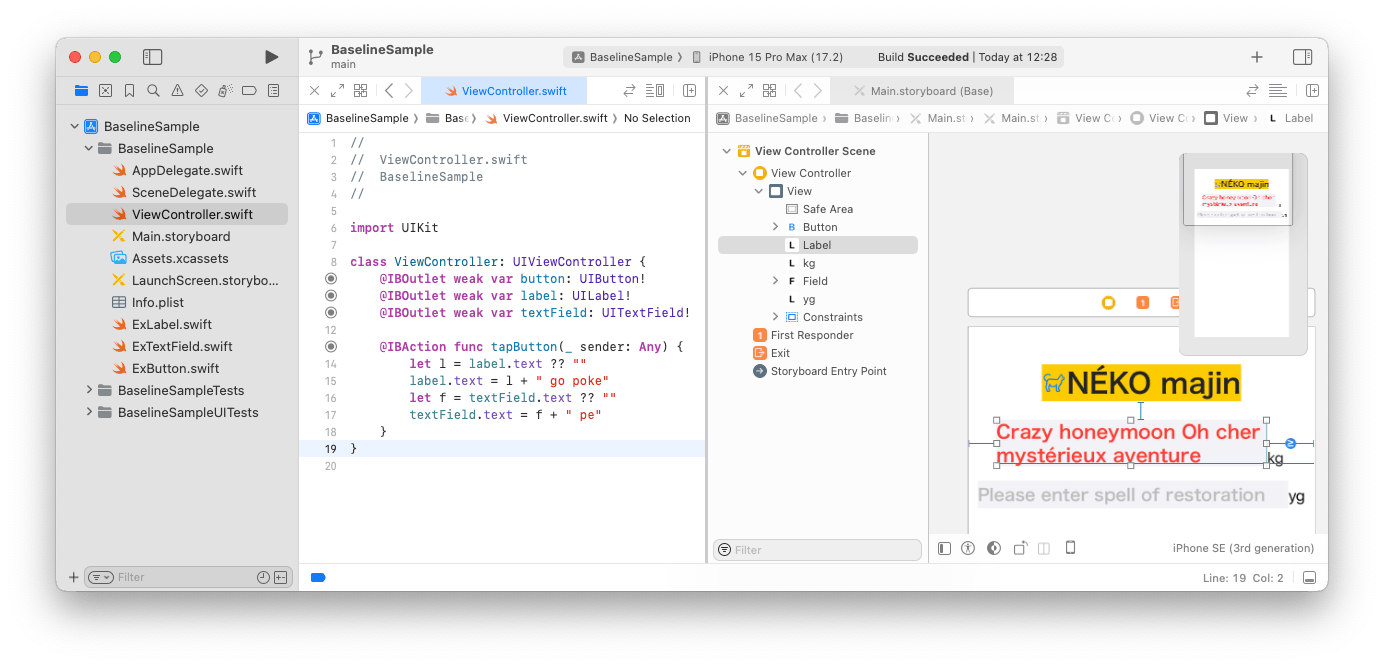
表示テスト
テキストが更新されても属性が保持されるか確認するために、ボタンタップイベントにテキスト更新処理を追加します。ラベルのベースラインに配置したラベル「kg」も、行が増えても揃っているようです。
    @IBAction func tapButton(_ sender: Any) {
        let l = label.text ?? ""
        label.text = l + " go poke"
        let f = textField.text ?? ""
        textField.text = f + " pe"
    }
おわりに
これらの派生クラスは、他のフォントファミリーに影響を与えないため、
共通の機能を追加できる点で、非常に実用的なものが作成できたと考えています。
環境
- Swift 5.9.2
- Xcode 15.2 (15C500b)
- iOS 17.5.1 (Minimum Deployments: iOS 13.0)
- macOS sonoma 14.5
